Red velvet cake is mega popular right now. I've already lost count of how many times I've done it.
The dough is very easy to make, especially if you have a stand mixer in your kitchen. Place everything in a bowl and beat until smooth.
I bake three cakes with a diameter of 24 cm. You can bake in one form, and then cut. But by baking each one separately, we get an even cake without cracks (I like this option better).
I always make red velvet cake with cream cheese frosting. You can eat it right away, but if you let the cake sit, it will be a flavor bomb!
As for decoration. It all depends on your occasion and imagination. I decorated the cake with chocolate and fruit. In general, you can disguise this beautiful cake under any decoration.
Our ingredients for the dough.
We put the bowl on the scales. First, add all the dry ingredients.

Then add the liquid ingredients.

Beat the dough with a mixer until smooth and homogeneous.

We cover the form with baking paper. Pour out the dough.
If you bake three cakes, you get 450 g of dough for each.

Bake the cakes at 170 degrees until done. Approximately 12-15 minutes.
Run a spatula around the edge of the pan and remove the cake, remove the paper and cool the cake on a wire rack.
The cakes are very delicate, you need to work with them carefully.

Ideally, wrap the cakes in film (each separately) and leave for at least a couple of hours.
I bake the cakes in the evening and assemble the cake in the morning.

To make it really beautiful, I trim the edges. You don't have to do this.

The cream for the cream must be cold.

Whip the cream to stable peaks.
Add cheese and powdered sugar.
Beat again until smooth.

It is more convenient to assemble the cake in a split ring. If this is not the case, you can do it in the usual way.
Spread a third of the cream onto the crust and smooth it out.

Cover with the second cake layer and spread the cream again.

Close with the third cake layer. We remove the ring.

Apply cream to the sides and top of the cake.

Smooth out the cream and decorate.

Today I made a red velvet cake with cream cheese cream like this. Try it, you won't regret it!

You can leave the sides open, it also looks great.


Red Velvet cake is a true masterpiece of confectionery art, which has been known to the world for a long period. At first glance, one might get the impression that such a product can only be prepared by a professional master with a lot of culinary experience behind him, however, this is not at all the case. "Red velvet" is a cake that even a novice housewife who is not familiar with all the intricacies of cooking and confectionery can prepare - it will require a small amount of patience and attentiveness to the cooking process itself.
Story
The history of this elite culinary masterpiece dates back to the 19th century, when residents of European countries already knew about the existence of the original red sponge cake. At that time, it was considered a royal dessert, the taste of which amazed all those who tried it. According to another version, the history of the Red Velvet biscuit recipe dates back to the Great Depression, known to the US population. At that time, the demand for food decreased significantly, as a result of which one confectionery decided to attract the attention of customers with an unusual red dessert.
This cake first received its name in 1972, its author was the American confectioner James Beard, who became the author of the original color of the sponge cake, obtained by combining vinegar with sour buttermilk. This operation of removing the special red hue of the biscuit is called Dutch by the culinary specialist.
At the moment, there are a considerable number of recipes for this dessert, which are used by many confectioners. All of them are good in their own way, and the cakes made using them have an original look and a savory taste that appeals to millions of sweet tooths.
So, how to bake red velvet cake? What features does this process have? More on this below.

Taste qualities
Many people really like the unusual appearance of such a cake, but what does a Red Velvet sponge cake taste like?
This confectionery product has a rather delicate taste with unobtrusive chocolate notes. In addition, after tasting such a dessert, the sweet tooth will feel the pleasant creamy taste that the cream has for a long time.
Thanks to the large number of moisture-retaining ingredients, the sponge cake that forms the basis of this confectionery product is quite wet and juicy, as a result of which its classic recipe does not even require impregnation.
Biscuit ingredients
- 250 g wheat flour;
- 120 g butter;
- 1.5 cups sugar;
- 3 eggs;
- a glass of low-fat kefir (can be replaced with buttermilk);
- 2 bags of vanilla sugar (10 g each);
- 2 tbsp. l. cocoa powder;
- 1 tsp. soda (previously slaked with table vinegar);
- 1.5 tsp. red food coloring;
- 0.5 tsp. salt.
Stage 1. Preparation
Before you start preparing the red velvet chiffon sponge cake, you need to sift the amount of flour indicated in the list of ingredients. The baking dish chosen for baking also needs to be prepared - it should be covered with parchment and greased with a piece of butter. Also at this stage you should turn on the oven and, choosing a temperature of 180 degrees, leave it to warm up.
Stage 2. Dough
The sifted flour should be salted and cocoa powder should be added to it, which should not be sweet. In a separate bowl, you need to prepare the creamy mixture, for which the butter is first whipped separately using a mixer until it breaks into small lumps, and then the specified amount of sugar is added there and the procedure is repeated. The red velvet cake recipe recommends doing this on low speed. While beating, add chicken eggs into the mixture and gradually bring the contents until smooth. If the mass turns out fluffy and as homogeneous as possible, the cake will turn out right, very beautiful and tasty. As soon as the mass becomes fluffy, flour and cocoa should be gradually poured into it, doing this in small portions to avoid the formation of unwanted lumps.
Without stopping the beating process, you should add pre-prepared food coloring to the dough, which should be diluted in kefir (or buttermilk). This should be done in a thin stream so that the dye is evenly distributed throughout the dough.
Some chefs recommend adding kefir and flour alternately, after dividing these ingredients into equal two or three parts. That is, you can first add a third of the flour with cocoa, then pour in half of the kefir or buttermilk, then add the flour again and alternate this way two more times. By following this recommendation, you can achieve the perfect silkiness of the finished dessert, which is an indicator of the culinary skill.
At the very last stage of preparing the dough, without stopping the mixer, you should quickly add soda slaked with vinegar to the dough (you can also use lemon juice for this purpose).

Stage 3. Baking
All those who know how to make red velvet sponge cake recommend using round molds with a clamp for baking. This is due, firstly, to the fact that this cake was originally conceived as a round product, and secondly, it can be removed from a mold of this type without damaging the product, simply by spreading the clamps.
The red velvet sponge cake is baked in the oven at a fairly high temperature - 180 degrees. Pour half of the prepared dough into the prepared pan and place it in a well-heated oven for 25 minutes. The same should be done with the remaining half. As soon as both cake layers are ready, you need to put them in the refrigerator for 3-4 hours, pouring the pre-prepared red velvet cake mixture over them.
Stage 4. Assembling the cake
After all the steps have been completed and the cakes have stood for the required time in the refrigerator, it’s time to start assembling the cake. To do this, take the prepared sponge cake for the Red Velvet cake and coat it on all sides with thick cream, which can be prepared while the cakes are in the refrigerator. As professional chefs recommend, there should be a lot of cream on this dessert.
Once the cake is formed, it can be decorated with various cream products that can be squeezed out of the bag. If desired, you can sprinkle it with chocolate chips. After all this, you should send the confectionery product to a cool place for some time to infuse. The ideal option would be for him to stay in such a place for 8-10 hours.
Ingredients for making cream

Technology for preparing cake cream
The ideal cream for such a cake is one that has no lumps and has a pleasant creamy taste. Properly prepared cream is the key to a delicious cake in the end.
In order for the mass to turn out the way it should be, you should take cream cheese and butter, combine them in one bowl and beat them thoroughly using a mixer. For this purpose, you can use a high speed machine, which cannot be done during the dough preparation process.
After the creamy mass becomes homogeneous, you need to add vanilla sugar and powder to it and then beat again until completely homogeneous. As culinary experts note, the correct cream should have a very thick consistency so that a spoon lowered into it does not change its specified position.

Another recipe for sponge cake for red velvet cake
This version of the recipe for this product, unlike the previous one, is not classic, but is also quite simple to implement. This is just another easy option on how to make red velvet cake.
In order for it to turn out to be the correct consistency, and the end result is an original and tasty delicacy, you need to take five eggs and combine them with 500 g of granulated sugar. These ingredients should be thoroughly beaten and set aside. Now is the time to start making the liquid base of the cake.
In order to make the base for the dough, you need to take 400 g of kefir and a small amount of soda (it does not need to be quenched with vinegar, since the fermented milk product itself has an acidic environment). Next, you need to add food coloring to the total mass, which in bulk form will require about 30-40 g and a couple of glasses of vegetable oil. When choosing oil, you should pay attention to the fact that it is refined (odorless), otherwise the taste and aroma of the finished product will be greatly spoiled.
Now you can start creating the dough. To do this, sift 650 g of wheat flour, add a small amount of cocoa powder (about 2 tablespoons), as well as a small amount of salt. After mixing, the bulk mixture should be added to the beaten egg mass, and colored kefir should also be added there. In this composition, the ingredients should be thoroughly beaten using a mixer until a homogeneous mass is formed. The dough is ready.
In all other respects, the process of preparing a sponge cake is similar to that described above: each cake should be baked in the oven at 180 degrees for 25 minutes. You can always check the readiness of the product with a toothpick.
Impregnation of the cake
As you know, almost all confectionery products require impregnation. As for the recipe for red velvet sponge cake, many of them do not talk about such an element at all. This feature is due to the fact that the cake ultimately turns out to be quite juicy, which is due to the use of a large amount of kefir in the process of preparing the dough for it.
However, as you know, impregnation has not yet harmed any cake, so at home you can make the cake more juicy. For this, the housewife has the right to use any syrup.

How to replace the dye
If there is no red dye in the house or the housewife is against the use of such elements in food, then in this case you can use substitute ingredients. In particular, beet juice can become this, which will not at all spoil the taste of the confectionery product. When using it, you should also take into account the fact that it is not capable of giving such a rich shade as, for example, gel or powder dye, but it will undoubtedly add redness to the cakes.
Some red velvet cake recipes recommend replacing it with cocoa powder if you don't want to use red coloring. In this case, you also get a very original black and white product. When implementing this cooking option, the cake will have a richer chocolate taste than the classic red version, where cocoa is also present among the ingredients.
Nuances in preparation
In the process of preparing such a culinary masterpiece, you should pay attention to some points that can significantly improve or, conversely, worsen its taste.
So, in the process of creating a delicious cream, many chefs recommend adding cream cheese to it as cold as possible. That is, according to the advice of experienced masters, the butter should be kept at room temperature for some time before cooking (so that it is softer), and the cheese should be taken out only before it needs to be sent to the whipping container. In this case, the texture of the cream will be the smoothest and silkiest, which, in fact, is what many are trying to achieve.
As for the taste of the dessert, it has a distant chocolate taste, which is pleasant to most gourmets who adore such a cake. If desired, any cook has the opportunity to enhance it by making a Red Velvet sponge cake with chocolate mousse - for this purpose it is enough to simply increase the amount of cocoa powder that is included in the classic recipe.
During the decorating process, you can also carry out a number of experiments. In particular, for this purpose you can prepare berry or chocolate mousse and decorate the surface of the finished product with it. Many chefs advise using cranberry-based additives, which give the cake a pleasant sourness that goes well with the overall traditional taste. To prepare cranberry mousse, you can grind 350 g of cranberries until pureed and carefully rub them through a fine sieve. Then you should dilute 10-15 g of gelatin with warm water, following the instructions indicated on its bag. After this, you need to create a mixture of 12 g of corn starch and half a glass of sugar, add grated cranberries to it, mix well and cook over low heat, remembering to stir occasionally. As soon as the mixture boils, you need to wait another minute, pour gelatin into it, stir the mixture until all the grains are completely dissolved and cool to room temperature. After such simple manipulations, the finished mass can be poured into a mold, the diameter of which will be equal to the one in which the cake is baked and, covered with cling film, set aside for a while in the refrigerator. As soon as the cake is ready, you can put this fondant on it.

Indications for storage
As professional chefs note, properly prepared red velvet cake can be stored for quite a long time. In particular, if it is kept in a refrigerator, then its suitability for consumption remains for a week, and if the dessert is frozen, it can be preserved for a month.
It is incredibly delicate and refined, with a silky, uniform texture. Evokes images of cheesecake, soufflé and grandma's village sour cream. At the same time, the cream is thick and retains its shape well - you can use it to smooth out cakes and create fancy decorations.
Does it seem difficult to prepare such a delicacy? Not at all. Try making red velvet buttercream from the mixture "Vanilla frosting S. Pudov". Just beat the mixture with 200-250 grams of butter. In just 3-4 minutes, the delicious, long-lasting cream for the cake is ready. Easy, right? And imagination is not limited. Any decorations made from butter cream hold their shape well and retain their original appearance.
If you decide to follow the rules and bake an original cake, you will have to spend a little more time on the cream. For the classic Red Velvet recipe, the so-called “cream cheese” is used - a cream based on cream cheese. Not everyone is familiar with it, as it came to us recently from Western cooking. Abroad, cheese cream for cake is prepared from mascarpone, ricotta or Philadelphia. Well, Russian magicians use more affordable creamy curd cheese. In any case, the Vanilla Frosting mixture will come in handy. It makes the right cream for a cake from almost any cheese!
Recipe for red velvet cream based on Philadelphia cheese
Since Red Velvet is American, let's start with the classic recipe for Philadelphia American cheese cream. To produce it, pasteurized milk is taken, which is fermented and then heated.
Beat 170 g of softened butter with 100 g of mixture "Frosting vanilla" about 10 minutes. Add a tablespoon of milk and 180 g of classic Philadelphia cream cheese. Mix everything thoroughly with a wooden spatula. You can cover the cake.
Cream cheese cake cream
Philadelphia is made by only one company and is not easily available for sale. Therefore, more affordable analogues are also suitable - creamy curd cheeses from the nearest supermarket (Hochland, Almette, Kaymak, etc.) But choose wisely. A good natural product should contain milk or cream, a bacterial starter and salt. If preservatives are indicated, it is better to leave such a product in the store. And no vague “cheese products” - just the word “cheese”.
You can reduce the amount of butter by increasing the amount of cheese. Mix 1 package "Frosting Vanilla" and 115 g softened butter. Beat (5-7 minutes) and add approximately 340 g of cold cream cheese.
Cream cheese cream
Traditional cream cheese cake can be made lighter by replacing the butter with whipped cream.
Whip 300 g of cold cream 33% until the consistency becomes thick. Separately mix 100 g of the mixture "Frosting vanilla" and 400-500 g of cream cheese, beat a little. Next, you should gradually add cream to the resulting cheese mass and stir gently so that the mass does not fall off.
Low-calorie cream for red velvet cake
A low-fat cheese option is ricotta. Suitable for dietary nutrition, as it is based on skim cow's or goat's milk. Although the whole thing is not excluded. Use this delicate, sweetish cheese in the cream recipe so that your conscience is calm regarding the calories you eat.
Salt, which is present in curd cheese, enhances the taste of the cream and makes it less cloying. In the case of cottage cheese or ricotta, you can add a little sea salt for the same purpose.
For a light low-calorie cream, low-fat cheese (ricotta) or soft cottage cheese 0% is used as a basis. It is enough to beat the dairy product with a sweetener (without butter or cream) and put the cream in the refrigerator for a couple of hours. Add a substitute according to taste and shape.
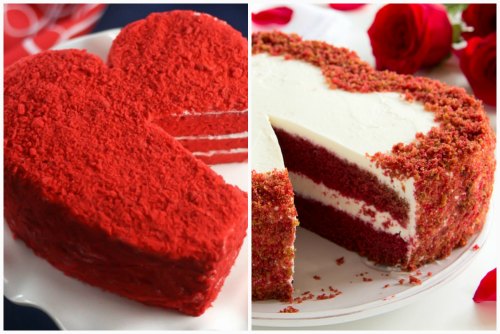
The Red Velvet cake, or in the American version Red Velvet, has won enormous recognition and love from sweet tooth fans from all over the world. Because of its scarlet color, it is sometimes called devil's food. It is one of the brightest and catchiest desserts, along with. It owes its uniqueness not only to its nuclear red color, but also to the original delicate taste of the porous cakes, similar to real velvet. The airy buttercream also gives it a special taste.
This unique miracle of confectionery thought is prepared by many famous chefs. Therefore, we will look at how to prepare a red velvet cake in the original version with a photo. You will also see a recipe from Yulia Vysotskaya and Andy Chef, the “titans” of cooking. And lovers of healthy eating will love the instructions for cooking with natural dye.
Red velvet cake - classic version
The original recipe calls for buttermilk as one of the ingredients. But you can replace it with kefir. For dessert with a diameter of 20-22 cm you will need the following products:

- Flour – 450 g;
- Cocoa – 1.5 large spoons;
- 4 eggs;
- Vegetable oil (refined) – 400 ml. You need to choose the highest quality so that the finished sweet does not have an unpleasant odor or taste;
- Sugar – 400 g;
- Fine salt - a quarter of a small spoon;
- Kefirchik – 370 g;
- Baking powder – 2.5 small spoons;
- Soda – 1.3 small spoons;
- Red gel food coloring – 2-3 small spoons.
- – 400 g;
- Cream (33%) – 300 g;
- – approximately 150 g (can be adjusted to taste).

Let's start the cooking process:
- In one container, break the eggs and combine with sugar, turn on the mixer and beat the ingredients until a white thick mixture;
- Pour kefir into the second bowl and add quicklime soda to it. Mix well;
- Add the dye here and stir until the mixture turns a bright red hue. If pallor is observed, then you can add a little more dye. Add vegetable oil;
- Pass flour, baking powder and cocoa through a fine strainer and mix in a separate plate. Add some fine salt here;
- Combine the contents of all three containers and beat with a mixer until a homogeneous dough mixture of a bright red hue. There should be no lumps left;
- Divide the mixture equally into two baking dishes. The bottom can be covered with baking parchment;
- The process of baking a biscuit takes 30-40 minutes in an oven preheated to 180 degrees. Readiness is checked by dipping a toothpick into the center of the dough. If it remains dry, then you can remove the product from the oven;
- Let each biscuit cool and divide in two. The result is four cake layers for our dish;
- Making cream for red velvet cake. In one container, beat the chilled cream until thick. In another, combine powdered sugar with room temperature cream cheese and beat slightly;
- Gradually add cream to the cheese and carefully mix everything with a spoon. Now our impregnation is ready. You need to place it in the refrigerator for about 4 hours, covering the bowl with film. This way it will become denser and will not absorb foreign odors;
- Now let's assemble the cake step by step. Place the first shortbread on a wide plate and coat it evenly with cream. Then we repeat the manipulations until all the cakes are finished;
- We also coat the last cake with impregnation, trim the entire surface from above and from the side with a culinary spatula or a wide knife;
- You can decorate the finished sweet with berries and mint leaves. Before serving, let the biscuit soak in the refrigerator for about three hours.
Red Velvet recipe from Yulia Vysotskaya
The preparation scheme in this version is practically no different from the previous one. The cream remains the same, but buttermilk or kefir is replaced with sour cream and cream. A step-by-step recipe for Red Velvet Cake from Julia Vysotskaya will tell you about this and a few other nuances.

Ingredients for 4 servings:
- Cocoa – 1 large spoon
- Flour – 340 g;
- Sugar – 300 g;
- Salt - a quarter of a small spoon;
- Soda – 1 small spoon;
- Vegetable oil – 300 g;
- 3 eggs;
- Cream (35%) – 150 g;
- Sour cream (20%) – 150 g;
- Red food coloring – 2 small spoons.

The composition and technology of preparing the cream does not change. And the homemade red velvet cake itself is made as follows:
- The dough is very easy to create. In one container, combine flour, sugar, salt, baking powder, soda and cocoa;
- Then beat the eggs and add vegetable oil. It should not contain any odor. You can use olive oil;
- At the end, heavy cream and sour cream are added, as well as coloring;
- To obtain a pungent red tint, you can increase the amount of dye. All ingredients are mixed with a mixer;
- You will get a liquid dough. Don't be alarmed, this is how it should be. Do not rush to bake the cakes right away, but leave the dough for 10-20 minutes so that the soda reacts with the milk component;
- Line the bottom of the baking dish with parchment. We make a “French shirt”: coat the entire mold with butter and apply a little flour on top. Pour in the required amount of dough depending on the diameter of the future cake;
- Baking is carried out at 170 degrees for 20 minutes. Remove the finished cakes and cool, then wrap each individually in cling film and place in the refrigerator for a couple of hours. This way they will become softer and more tender;
- Take out the cakes, cut off the browned top and a small layer from the ends. But if you do not cover the outside of the dessert with cream, then the sides can be left as is;
- Assemble the cake, coating each cake in turn with the impregnation. Apply it on top and sides. Decorate the sweet as you wish and refrigerate for about 5 hours to soak.
Red Velveteen recipe from Andy Chef

Red velvet cake at home is made exactly the same as in the previous recipe, but is coated with cream made according to Andy Chef’s special instructions. It's very simple. Need to stock up:
- Curd cheese – 340 g;
- Vanilla extract – 2 small spoons;
- Powdered sugar – 100 g;
- Butter – 115 g;
You just need to combine everything together in one bowl and beat until smooth using a mixer for 5-7 minutes.

There are a few more subtleties to make the cream perfect:
- The cheese should be curd cheese. Replacement with fused one is strictly prohibited. Hochland products are best suited. But you can also use cheeses like, or;
- The cheese should be very cold and hard. To do this, you need to keep it in the refrigerator overnight;
- The oil, on the contrary, should be soft. You can keep it for several hours at room temperature. It is necessary to use a product with a fat content of 82.5% and containing cream;
- If you need to make the color of the cream whiter, or the powder squeaks, you must first beat the butter and powder at maximum speed for 7-10 minutes, and only then add the cheese.
Recipe for “Red Velveteen” with natural dye

The cooking process remains virtually unchanged. Only this Red Velvet is made with beets. Required:
- Flour – 240 g;
- Salt - a pinch;
- Cocoa – 1 small spoon;
- Baking powder – 2 small spoons;
- Vegetable butter – 140 g;
- Sugar – 150 g;
- Vanillin – 8 g;
- Eggs – 2 pcs;
- Milk - a glass;
- Beetroot puree – 160 g;
- Wine vinegar – 1 large spoon;
- Kefir – 75 g;

For impregnation:
- Water – 90 ml;
- Sugar – 50 g;
- Cream cheese – 260 g;
- Sugar – 170 g;
- 4 egg whites;
- Butter – 180 g;
- Vanillin - a sachet.

- Preparing beets for puree. Wrap it in foil and bake in the oven for an hour. Cool, peel, cut into cubes and puree in a blender;
- Combine the beetroot mass with vinegar, kefir and milk, mix. Then add sugar and vanillin, add vegetable oil, add salt and mix thoroughly again;
- In a separate container, mix cocoa, flour and baking powder. Combine everything with the beet mixture, knead the dough and fill the baking dish with it;
- Bake the cake for half an hour at a temperature of 180. Once ready, cool and cut it into 3 cakes;
- For impregnation, prepare syrup. To do this, mix sugar with water, put it on the flame and cook until the sugar completely disappears. Remove the syrup and cool;
- For the cream, combine egg whites with sugar and vanilla. Place the mixture in a water bath;
- Combine the cheese with butter and carefully add it to the protein mixture, remembering to stir. Cook in a water bath until thick;
- Soak each cake in syrup and coat with cream. We decorate at our discretion.

Making your own red velvet cake is not difficult. You just need to prepare the necessary products, reserve time, and study all the nuances. As a result, you can surprise your guests with an original and delicious dessert.
Video: Detailed recipe for Red Velvet Cake
Hello my young friends! Your permanent dessert consultant Olya Athinskaya is in touch with the last post of this year on the topic: Red Velvet Cake, dammm. Well, girls and boys, “The New Year is coming” and we have 4 days left to fit into a New Year’s dress and decide on snacks and dessert. As I’ve already told you many times, I can’t help you with appetizers, but for dessert I highly recommend making this fiery red, New Year’s-style festive cake.
You may ask “why him?” I answer:
What's good about red velvet?
First of all, this cake is very easy and simple to make at home, even if you had to prepare everything at the last minute.
Secondly, despite its ease of preparation, Red Velvet is a very impressive and beautiful cake that impresses absolutely everyone.

Well, and thirdly, it is so tender, soft and tasty that your guests simply cannot help but like absolutely everything. And no one will ever guess that you put a minimum of effort and time into this.
Plus, when we spend so little time on the cake, we can play more with the decor and decoration. Although the bright color of Red Velvet itself is quite impressive and does not require too sophisticated decorations. I have this decor made of white chocolate with splashes of golden pollen (kandurin) - sold in online stores.

I’ll also tell you how I worked with chocolate in one of the following posts.
Looking for a classic recipe
To be honest, I have been looking for a classic Red Velvet recipe on American resources for a very long time. And here's what I found out:
- As a rule, Red Velvet Cake in America is prepared for Christmas or Valentine's Day ( *take note about Valentine's Day).
- The main and unshakable ingredients of this cake: kefir, vinegar, cocoa, red coloring and cream cheese (cream/curd cheese).
- There are three main ways to prepare Red Velvet: with margarine, with vegetable oil and with butter, but the most common option is vegetable oil, thanks to which the cakes remain moist, soft and do not go stale for a long time.
- Sometimes concentrated beet juice is used as a dye.
- It is said that the recipe for red velvet cake was distributed in America by the Adams Extract company, which was one of the first to initiate the sale of food coloring. Actually, this was the prosaic reason for the red color of the cake: they needed to sell more dye. This happened during the era of the Great American Depression, that is, in the 30s of the last century.
- Initially, the cream for Red Velvet was prepared with butter and custard: flour was brewed in butter with milk and butter was mixed in. Nowadays cream cheese with butter is used everywhere. This gives the cake a slight sourness and makes it much more interesting and tastier.

Which dough should you choose?
I thought for a long time about which method of preparing the dough to choose. I knew that it would taste best, of course, with butter. But cake dough prepared with butter has one peculiarity: in the refrigerator such cakes become hard, and if you leave the cake without a refrigerator, then the cream will become too soft and the cake may lose its shape.

Therefore, I settled on a mixture of vegetable and butter, so that it would be tasty, soft, and warm. Below, read a detailed recipe for a cake at home with step-by-step photos.
Red Velvet Cake Recipe
We will need
For the test:
- flour - 333 gr.
- corn starch - 40 gr.
- soda - 1 tsp.
- cocoa powder - 10 gr.
- salt - ½ tsp.
- sugar - 400 gr.
- odorless vegetable oil - 240 gr.
- eggs, room temperature - 4 pcs.
- vanilla extract - 1.5 tbsp. ( you can buy it here )
- vinegar - 1 tsp.
- red food coloring - 1−1.5 tbsp. ( You can buy it at BakerStore )
- kefir, room temperature - 240 gr.
For cream:
- cream cheese (cream cheese), room temperature (you can take curd cheese, like Almette) - 450 gr.
- butter, softened - 115 gr.
- powdered sugar - 350 gr.
- cream or milk - 30−45 gr. (of necessity)
- vanilla extract - 2 tsp.
And one more important point. All American authors advise using natural for this cake, non-alkalized cocoa powder. In combination with the acids of vinegar and kefir, natural cocoa gives a reddish tint, and also makes the cakes even more porous and melting in the mouth. In addition, it is not so dark, and the red color turns out lighter. Today, such cocoa is quite difficult to find, which is why we add a lot of dye. But try to find cocoa of at least good quality.
In addition, the same Americans use softer flour for Red Velvet, which they call “cake flour”, to get more velvety and tender cakes. For these purposes we will use a mixture of premium flour and starch.
Step-by-step cooking method
First, let's prepare the cake layers:
*this can be done the day before

Now prepare the cream:


OK it's all over Now. This time I say goodbye to you until next year and wish you only successful culinary experiments and a festive mood.


Good luck, love and patience.